Coraley Letcher is a Fernie yoga instructor who believes in the importance of cross training and applying skills acquired in yoga during other physical activities — like when hitting the ski hill.
“One of the great things about yoga is that it’s a balance between stretch and strength so when you’re taking it into something like skiing and snowboarding it gives you an opportunity to build strength in areas that need support like the thighs, knees and ankles and stretch out areas that get tight like your hips,” explained Letcher.
She added, “It’s a good way to cross-train and make sure that you’re not building up habits that are going to create injuries.”
Letcher put together a quick yoga routine comprised of seven poses she believes will assist powder enthusiasts, demonstrating the sequence at The Arts Station while decked out in athletic-wear by Freyja.

Coraley:
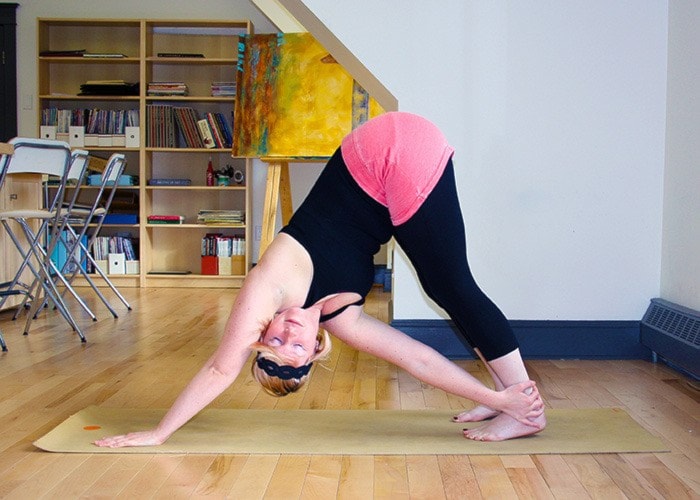
1. Downward Facing Dog (Adho Mukha Svanasana)
Begin on the floor on hands and knees in a table top position with your knees lined up with your hips and your hands slightly forward of your shoulders. Spread your fingers wide on the mat before tucking your toes under and raising your hips skyward. Firm your arms, pressing your index fingers into the mat. Your shoulder blades should be flat to your back and drawing toward your tailbone. It is okay if your knees are slightly bent and your heels are up off the mat. Continue pressing the hips up and back and staying engaged with the arms and shoulders.
Benefits: Downward dog helps to stretch the back body while strengthening the arms and the core. It is also a naturally energizing pose – a great way to rejuvenate after a day on the hill.
---

2. Warrior 2 (Virabhadrasana 2)
From down dog, draw your right leg forward planting your foot between your hands. Turn your left foot out so that it is parallel to the back of the mat before rising up with your body, opening your arms into a T position. Firm your thighs and let your right thigh press outward so the knee cap is in line with the ankle. The outside edge of the left foot should press into the floor and your hips should be opening to be in line with your shoulders and torso. The gaze falls over the front fingers.
Benefits: Warrior 2 strengthens the legs, knees and ankles while opening the hips and the groin. This pose also builds stamina and concentration, two skills that are of great benefit to skiers and boarders.
---

3. Mountain Pose (Tadasana)
From warrior 2, step into your right leg bringing your left foot into a parallel line with the right foot. Depending on how this feels in your body your feet may be hip width apart or together. Root down through your feet and draw up with the leg muscles. Allow the pelvis to come into a neutral position, lining up with the shoulders and ears. Feel your shoulders relax down as the crown of the head lifts skyward.
Benefits: Mountain pose improves posture and strengthens the thighs, knees and ankles. A great pose for relieving tension, aches and pain throughout the body, it also helps to increase awareness of the body and of placement.
---

4. Chair Pose (Utkatasana)
From mountain pose bend your knees and raise your arms overhead, lining up with the ears. Keep your knees in line with your ankles and be sure that you can see your toes. Your core should stay strong, with the belly button pressing in toward the spine and your bum should stick out like you are sitting in a chair.
Benefits: Chair pose strengthens the ankles, knees, thighs and core, while stretching the chest and shoulders. It is also an excellent pose for building strength, stability, stamina and balance.
---

5. Warrior 3, Airplane variation (Virabhdrasana 3)
From chair pose begin to straighten the knees while simultaneously lifting the right foot off of the floor and transferring your weight into the left. Allow the right leg to travel in a long line behind you while letting your body travel forward (your body and leg should form one long line). Let your arms sweep back next to your body like the wings of a plane. Keep your right leg pressing upward while not letting the torso collapse forward. The muscles of the supporting leg should be engaged with special attention given to avoid locking the knee.
Benefits: This pose improves balance and posture while strengthening the shoulders, back, legs, ankles and abdomen. It is also a great pose for improving concentration.
---

6. Low Lunge (Anjaneyasana)
When you are ready to move out of warrior 3 slightly soften the supporting leg and maintain your core engagement as you begin to shift your weight backwards landing in a lunge position with the right leg behind you. Lower the right knee down to the mat and untuck the toes so that the top of the foot lays flat on the mat. Raise the arms up, reaching your fingertips skyward and taking care not to shrug the shoulders up toward the ears. You can move the right knee closer to the front or the back of the mat to find the right level of stretch for your body.
Benefits: Anjaneyasana stretches the hips and psoas while building knee and gluteus muscle strength, an excellent combination of physical benefits for skiers and boarders. This pose also helps to hone mental focus and improves balance, concentration and is a great way to build awareness of the core body.

7. Revolved Downward Facing Dog (Parivrtta Adho Mukha Svanasana)
Bringing the hands down to frame the feet, step the left foot back so that you are in a table top position again. Tuck the toes under and rise up to downward facing dog. When you’ve found your down dog, pick up the right hand bringing it across your body to your left calf or ankle. Maintain integrity of the core in the twist by keeping the muscles of the abdomen and back engaged and keeping both sits bones on an equal plane. The gaze falls under the left arm.
Benefits: This pose stretches the shoulders, spine, and the TFL/gluteus medius area while toning the core and strengthening the arms and legs. Revolved downward facing dog can also help to relieve back pain and fatigue.
---
8. Repeat Sequence
From revolved down dog return to downward facing dog pose and repeat the sequence on the opposite leg. When you have finished on the left side, you may take a few breaths in child’s pose before taking savasana to finish your practice.